第五章 springboot + mybatis,springbootmybatis
springboot集成了springJDBC與JPA,但是沒有集成mybatis,所以想要使用mybatis就要自己去集成。集成方式相當簡單。
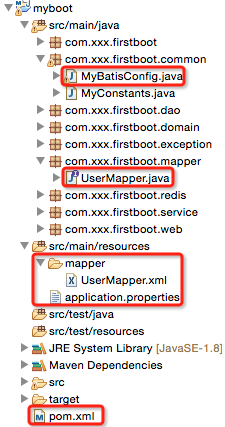
1、項目結構
2、pom.xml

![]()
1 <!-- 與數據庫操作相關的依賴 -->
2 <dependency>
3 <groupId>org.springframework.boot</groupId>
4 <artifactId>spring-boot-starter-jdbc</artifactId>
5 </dependency>
6
7 <!-- 使用數據源 -->
8 <dependency>
9 <groupId>com.alibaba</groupId>
10 <artifactId>druid</artifactId>
11 <version>1.0.14</version>
12 </dependency>
13
14 <!-- mysql -->
15 <dependency>
16 <groupId>mysql</groupId>
17 <artifactId>mysql-connector-java</artifactId>
18 <scope>runtime</scope>
19 </dependency>
20
21 <!-- mybatis -->
22 <dependency>
23 <groupId>org.mybatis</groupId>
24 <artifactId>mybatis</artifactId>
25 <version>3.2.8</version>
26 </dependency>
27 <dependency>
28 <groupId>org.mybatis</groupId>
29 <artifactId>mybatis-spring</artifactId>
30 <version>1.2.2</version>
31 </dependency>
View Code
說明:
3、application.properties
![]()
1 jdbc.driverClassName = com.mysql.jdbc.Driver
2 jdbc.url = jdbc:mysql://xxx:3306/mytestdb?zeroDateTimeBehavior=convertToNull&useUnicode=true&characterEncoding=utf-8
3 jdbc.username = root
4 jdbc.password = vvvxxx
5
6 mybatis.typeAliasesPackage=com.xxx.firstboot.domain
7 mybatis.mapperLocations=classpath:mapper/*.xml
View Code
說明:
4、com.xxx.firstboot.common.MyBatisConfig
作用:mybatis與springboot集成的入口
![]()
1 package com.xxx.firstboot.common;
2
3 import java.util.Properties;
4
5 import javax.sql.DataSource;
6
7 import org.apache.ibatis.session.SqlSessionFactory;
8 import org.mybatis.spring.SqlSessionFactoryBean;
9 import org.mybatis.spring.annotation.MapperScan;
10 import org.springframework.beans.factory.annotation.Autowired;
11 import org.springframework.context.annotation.Bean;
12 import org.springframework.context.annotation.Configuration;
13 import org.springframework.core.env.Environment;
14 import org.springframework.core.io.support.PathMatchingResourcePatternResolver;
15
16 import com.alibaba.druid.pool.DruidDataSourceFactory;
17
18 /**
19 * springboot集成mybatis的基本入口
20 * 1)創建數據源
21 * 2)創建SqlSessionFactory
22 */
23 @Configuration //該注解類似於spring配置文件
24 @MapperScan(basePackages="com.xxx.firstboot.mapper")
25 public class MyBatisConfig {
26
27 @Autowired
28 private Environment env;
29
30 /**
31 * 創建數據源
32 * @Primary 該注解表示在同一個接口有多個實現類可以注入的時候,默認選擇哪一個,而不是讓@autowire注解報錯
33 */
34 @Bean
35 //@Primary
36 public DataSource getDataSource() throws Exception{
37 Properties props = new Properties();
38 props.put("driverClassName", env.getProperty("jdbc.driverClassName"));
39 props.put("url", env.getProperty("jdbc.url"));
40 props.put("username", env.getProperty("jdbc.username"));
41 props.put("password", env.getProperty("jdbc.password"));
42 return DruidDataSourceFactory.createDataSource(props);
43 }
44
45 /**
46 * 根據數據源創建SqlSessionFactory
47 */
48 @Bean
49 public SqlSessionFactory sqlSessionFactory(DataSource ds) throws Exception{
50 SqlSessionFactoryBean fb = new SqlSessionFactoryBean();
51 fb.setDataSource(ds);//指定數據源(這個必須有,否則報錯)
52 //下邊兩句僅僅用於*.xml文件,如果整個持久層操作不需要使用到xml文件的話(只用注解就可以搞定),則不加
53 fb.setTypeAliasesPackage(env.getProperty("mybatis.typeAliasesPackage"));//指定基包
54 fb.setMapperLocations(new PathMatchingResourcePatternResolver().getResources(env.getProperty("mybatis.mapperLocations")));//指定xml文件位置
55
56 return fb.getObject();
57 }
58
59 }
View Code
說明:
- 類上邊添加兩個
- @Configuration注解(該注解類似於spring的配置文件)
- @MapperScan注解,指定掃描的mapper接口所在的包
- 在該類中,注入了Environment實例,使用該實例可以去讀取類路徑下application.properties文件中的內容,讀取文件內容的三種方式,見第二章 第二個spring-boot程序
- 在該類中,使用druid數據源定義了數據源Bean,spring-boot默認使用的是tomcat-jdbc數據源,這是springboot官方推薦的數據源(性能和並發性都很好)
- 根據數據源生成SqlSessionFactory
- 值得注意的是,數據源是必須指定的,否則springboot啟動不了
- typeAliasesPackage和mapperLocations不是必須的,如果整個項目不需要用到*Mapper.xml來寫SQL的話(即只用注解就可以搞定),那麼不需要配
- @Primary注解:指定在同一個接口有多個實現類可以注入的時候,默認選擇哪一個,而不是讓@Autowire注解報錯(一般用於多數據源,多個SqlSessionFactory的情況下)
這樣之後,在項目中再使用springboot就和在ssm中(配置完成後)使用一樣了。
5、com.xxx.firstboot.mapper.UserMapper
![]()
1 package com.xxx.firstboot.mapper;
2
3 import org.apache.ibatis.annotations.Insert;
4 import org.apache.ibatis.annotations.Param;
5
6 import com.xxx.firstboot.domain.User;
7
8 public interface UserMapper {
9
10 @Insert("INSERT INTO tb_user(username, password) VALUES(#{username},#{password})")
11 public int insertUser(@Param("username") String username, @Param("password") String password);
12
13 /**
14 * 插入用戶,並將主鍵設置到user中
15 * 注意:返回的是數據庫影響條數,即1
16 */
17 public int insertUserWithBackId(User user);
18 }
View Code
說明:該接口中有兩個方法,
- 一個普通插入:直接用注解搞定
- 一個插入返回主鍵:需要使用xml來搞定
![]()
1 <?xml version="1.0" encoding="UTF-8" ?>
2 <!DOCTYPE mapper PUBLIC "-//mybatis.org//DTD Mapper 3.0//EN" "http://mybatis.org/dtd/mybatis-3-mapper.dtd">
3
4 <!-- 指定工作空間,要與接口名相同,源代碼沒有去看,猜測應該是通過"這裡的namespace.下邊方法的id"來定位方法的 -->
5 <mapper namespace="com.xxx.firstboot.mapper.UserMapper">
6
7 <!-- 若不需要自動返回主鍵,將useGeneratedKeys="true" keyProperty="id"去掉即可(當然如果不需要自動返回主鍵,直接用注解即可) -->
8 <insert id="insertUserWithBackId" parameterType="User" useGeneratedKeys="true" keyProperty="id" >
9 <![CDATA[
10 INSERT INTO tb_user
11 (
12 username,
13 password
14 )
15 VALUES
16 (
17 #{username, jdbcType=VARCHAR},
18 #{password, jdbcType=VARCHAR}
19 )
20 ]]>
21 </insert>
22
23 </mapper>
View Code
6、com.xxx.firstboot.dao.UserDao
![]()
1 package com.xxx.firstboot.dao;
2
3 import org.springframework.beans.factory.annotation.Autowired;
4 import org.springframework.stereotype.Repository;
5
6 import com.xxx.firstboot.domain.User;
7 import com.xxx.firstboot.mapper.UserMapper;
8
9 @Repository
10 public class UserDao {
11
12 @Autowired
13 private UserMapper userMapper;
14
15 public int insertUser(String username, String password){
16 return userMapper.insertUser(username, password);
17 }
18
19 public int insertUserWithBackId(User user){
20 return userMapper.insertUserWithBackId(user);
21 }
22
23 }
View Code
7、com.xxx.firstboot.service.UserService
![]()
1 package com.xxx.firstboot.service;
2
3 import org.springframework.beans.factory.annotation.Autowired;
4 import org.springframework.stereotype.Service;
5
6 import com.xxx.firstboot.dao.UserDao;
7 import com.xxx.firstboot.domain.User;
8
9 @Service
10 public class UserService {
11
12 @Autowired
13 private UserDao userDao;
14
15 public boolean addUser(String username, String password){
16 return userDao.insertUser(username, password)==1?true:false;
17 }
18
19 public User addUserWithBackId(String username, String password){
20 User user = new User();
21 user.setUsername(username);
22 user.setPassword(password);
23 userDao.insertUserWithBackId(user);//該方法後,主鍵已經設置到user中了
24 return user;
25 }
26
27 }
View Code
8、com.xxx.firstboot.controller.UserController
![]()
1 package com.xxx.firstboot.web;
2
3 import org.springframework.beans.factory.annotation.Autowired;
4 import org.springframework.web.bind.annotation.RequestMapping;
5 import org.springframework.web.bind.annotation.RequestMethod;
6 import org.springframework.web.bind.annotation.RequestParam;
7 import org.springframework.web.bind.annotation.RestController;
8
9 import com.xxx.firstboot.domain.User;
10 import com.xxx.firstboot.service.UserService;
11
12 import io.swagger.annotations.Api;
13 import io.swagger.annotations.ApiImplicitParam;
14 import io.swagger.annotations.ApiImplicitParams;
15 import io.swagger.annotations.ApiOperation;
16 import io.swagger.annotations.ApiResponse;
17 import io.swagger.annotations.ApiResponses;
18
19 @RestController
20 @RequestMapping("/user")
21 @Api("userController相關api")
22 public class UserController {
23
24 @Autowired
25 private UserService userService;
26
27 @ApiOperation("添加用戶")
28 @ApiImplicitParams({
29 @ApiImplicitParam(paramType="query",name="username",dataType="String",required=true,value="用戶的姓名",defaultValue="zhaojigang"),
30 @ApiImplicitParam(paramType="query",name="password",dataType="String",required=true,value="用戶的密碼",defaultValue="wangna")
31 })
32 @ApiResponses({
33 @ApiResponse(code=400,message="請求參數沒填好"),
34 @ApiResponse(code=404,message="請求路徑沒有或頁面跳轉路徑不對")
35 })
36 @RequestMapping(value="/addUser",method=RequestMethod.POST)
37 public boolean addUser(@RequestParam("username") String username,
38 @RequestParam("password") String password) {
39 return userService.addUser(username,password);
40 }
41
42 @ApiOperation("添加用戶且返回已經設置了主鍵的user實例")
43 @ApiImplicitParams({
44 @ApiImplicitParam(paramType="query",name="username",dataType="String",required=true,value="用戶的姓名",defaultValue="zhaojigang"),
45 @ApiImplicitParam(paramType="query",name="password",dataType="String",required=true,value="用戶的密碼",defaultValue="wangna")
46 })
47 @ApiResponses({
48 @ApiResponse(code=400,message="請求參數沒填好"),
49 @ApiResponse(code=404,message="請求路徑沒有或頁面跳轉路徑不對")
50 })
51 @RequestMapping(value="/addUserWithBackId",method=RequestMethod.POST)
52 public User addUserWithBackId(@RequestParam("username") String username,
53 @RequestParam("password") String password) {
54 return userService.addUserWithBackId(username, password);
55 }
56 }
View Code
測試:
進入項目的pom.xml文件所在目錄,執行"mvn spring-boot:run"(這是最推薦的spring-boot的運行方式),另外一種在主類上右擊-->"run as"-->"java application"不常用