第二章 第二個spring-boot程序,第二章spring-boot
上一節的代碼是spring-boot的入門程序,也是官方文檔上的一個程序。這一節會引入spring-boot官方文檔推薦的方式來開發代碼,並引入我們在spring開發中service層等的調用。
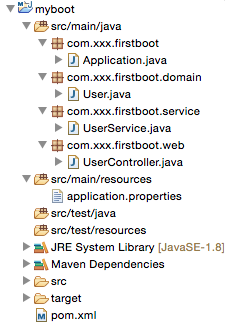
1、代碼結構如下
2、pom.xml

![]()
1 <?xml version="1.0" encoding="UTF-8"?>
2 <project xmlns="http://maven.apache.org/POM/4.0.0" xmlns:xsi="http://www.w3.org/2001/XMLSchema-instance"
3 xsi:schemaLocation="http://maven.apache.org/POM/4.0.0 http://maven.apache.org/maven-v4_0_0.xsd">
4
5 <modelVersion>4.0.0</modelVersion>
6
7 <groupId>com.xxx</groupId>
8 <artifactId>myboot</artifactId>
9 <version>1.0-SNAPSHOT</version>
10
11 <properties>
12 <java.version>1.8</java.version><!-- 官方推薦 -->
13 </properties>
14 <!-- 引入spring-boot-starter-parent做parent是最好的方式,
15 但是有時我們可能要引入我們自己的parent,此時解決方式有兩種:
16 1)我們自己的parent的pom.xml的parent設為spring-boot-starter-parent(沒有做過驗證,但是感覺可行)
17 2)使用springboot文檔中的方式:見spring-boot-1.2.5-reference.pdf的第13頁
18 -->
19 <parent>
20 <groupId>org.springframework.boot</groupId>
21 <artifactId>spring-boot-starter-parent</artifactId>
22 <version>1.2.5.RELEASE</version>
23 </parent>
24
25 <!-- <dependencyManagement>
26 <dependencies>
27 <dependency>
28 Import dependency management from Spring Boot
29 <groupId>org.springframework.boot</groupId>
30 <artifactId>spring-boot-dependencies</artifactId>
31 <version>1.2.5.RELEASE</version>
32 <type>pom</type>
33 <scope>import</scope>
34 </dependency>
35 </dependencies>
36 </dependencyManagement> -->
37
38 <!-- 引入實際依賴 -->
39 <dependencies>
40 <dependency>
41 <groupId>org.springframework.boot</groupId>
42 <artifactId>spring-boot-starter-web</artifactId>
43 </dependency>
44 </dependencies>
45
46 <build>
47 <plugins>
48 <!-- 用於將應用打成可直接運行的jar(該jar就是用於生產環境中的jar) 值得注意的是,如果沒有引用spring-boot-starter-parent做parent,
49 且采用了上述的第二種方式,這裡也要做出相應的改動 -->
50 <plugin>
51 <groupId>org.springframework.boot</groupId>
52 <artifactId>spring-boot-maven-plugin</artifactId>
53 </plugin>
54 </plugins>
55 </build>
56 </project>
View Code
說明:pom.xml文件與上一節的完全一樣。
3、Application.java
![]()
1 package com.xxx.firstboot;
2
3 import org.springframework.boot.SpringApplication;
4 import org.springframework.boot.autoconfigure.SpringBootApplication;
5
6 /**
7 * @EnableAutoConfiguration:spring boot的注解,一般只用於主類,
8 * 是無xml配置啟動的關鍵部分,明確指定了掃描包的路徑為其修飾的主類的包(這也就是為什麼主類要放在根包路徑下的原因)
9 *
10 * @ComponentScan 進行包的掃描,掃描路徑由@EnableAutoConfiguration指定了
11 *
12 * 主類要位於根包路徑下,方便之後的掃描(We generally recommend that you locate your main application class in a root package above other classes.)
13 */
14 @SpringBootApplication //same as @Configuration+@EnableAutoConfiguration+@ComponentScan
15 public class Application {
16 /**
17 * spring boot的入口,在整個子項目在內,
18 * 只能有一個main方法,否則spring boot啟動不起來
19 */
20 public static void main(String[] args) {
21 SpringApplication.run(Application.class, args);
22 }
23
24 }
View Code
注意:
- 主類要位於根包路徑下(例如,com.xxx.firstboot),這是推薦做法,方便掃描
- 每一個jar(即每一個子項目)都要有一個主方法,用於啟動該jar(也就是一個微服務)
- 在主類上添加注解@SpringBootApplication,該注解相當於添加了如下三個注解
- @Configuration:該注解指明該類由spring容器管理
- @EnableAutoConfiguration:該注解是無xml配置啟動的關鍵部分
- @ComponentScan:該注解指定掃描包(如果主類不是位於根路徑下,這裡需要指定掃描路徑),類似於spring的包掃描注解
4、application.properties
![]()
1 #user info
2 user.id=1
3 user.username=zhaojigang
4 user.password=123
View Code
注意:
- application.properties文件是spring-boot的默認文件,一般各種配置(包括:數據源配置,httpclient配置等)都配在這裡就好
5、User.java
![]()
1 package com.xxx.firstboot.domain;
2
3 import org.springframework.boot.context.properties.ConfigurationProperties;
4 import org.springframework.stereotype.Component;
5
6 /**
7 * @ConfigurationProperties(prefix="user")
8 * 自動讀取application.properties(是spring-boot默認查找的文件)文件中的user.*的屬性
9 * 在沒有使用@ConfigurationProperties的情況下,可以使用@Value("${user.id}")來一個個指定屬性的值
10 *
11 * 注意:如果要使用@ConfigurationProperties和@Value,需要將該bean添加@Component,
12 * 因為在後邊的對該類的使用中,需要直接將該類使用@Autowire注解注入,這樣這些屬性的自動注入才起作用,
13 * 具體使用查看"UserService"
14 */
15 @Component
16 @ConfigurationProperties(prefix="user")
17 public class User {
18
19 //@Value("${user.id}")
20 private int id;
21
22 //@Value("wangna")
23 private String username;
24
25 private String password;
26
27 public int getId() {
28 return id;
29 }
30
31 public void setId(int id) {
32 this.id = id;
33 }
34
35 public String getUsername() {
36 return username;
37 }
38
39 public void setUsername(String username) {
40 this.username = username;
41 }
42
43 public String getPassword() {
44 return password;
45 }
46
47 public void setPassword(String password) {
48 this.password = password;
49 }
50
51 }
View Code
注意:
- 該類就是一個普通的model,在ssm框架中我們並沒有將這樣的model歸給spring容器去管理,在這裡使用@Component注解將其交由spring容器去處理,這樣在之後的使用中,就可以直接將該model注入到其使用類中。
- 在該類上添加了@ConfigurationProperties(prefix="user")注解,這樣的意思就是可以自動掃描application.properties文件相關前綴的配置,並根據名稱配置到該類的每一個屬性上去
- 也可以在屬性上使用@Value注解單獨復值,當然前提是沒有配置@ConfigurationProperties,如果配置了,@Value注解失效
6、UserService.java
![]()
1 package com.xxx.firstboot.service;
2
3 import org.springframework.beans.factory.annotation.Autowired;
4 import org.springframework.stereotype.Service;
5
6 import com.xxx.firstboot.domain.User;
7
8 @Service
9 public class UserService {
10
11 @Autowired
12 private User user;
13
14 public User getUser(){
15 return user;
16 }
17
18 }
View Code
注意:
- 這裡直接注入了User,這和類正是上邊的那個model
7、UserController.java
![]()
1 package com.xxx.firstboot.web;
2
3 import org.springframework.beans.factory.annotation.Autowired;
4 import org.springframework.web.bind.annotation.RequestMapping;
5 import org.springframework.web.bind.annotation.RestController;
6
7 import com.xxx.firstboot.domain.User;
8 import com.xxx.firstboot.service.UserService;
9 /**
10 * @RestController:spring mvc的注解,
11 * 相當於@Controller與@ResponseBody的合體,可以直接返回json
12 */
13 @RestController
14 @RequestMapping("/user")
15 public class UserController {
16
17 @Autowired
18 private UserService userService;
19
20 @RequestMapping("/getUser")
21 public User getUser() {
22 return userService.getUser();
23 }
24
25 }
View Code
說明:
- 這個類其實就是開發中,開發一個spring-boot程序的最基本最常用的方式。(在微服務應用中,用到類似於"Java企業應用開發實踐"系列中的父子模塊開發,之後再說)
- 相對於ssm而言,spring-boot的讀取屬性文件的方式也相當容易,讀取屬性文件常用的三種方式
- 使用FileUtil去讀:見第一章 屬性文件操作工具類
- 使用如上的注解實現(最推薦的方式)
- 使用Environment這個類來獲取就行(這個可能寫錯類名了)
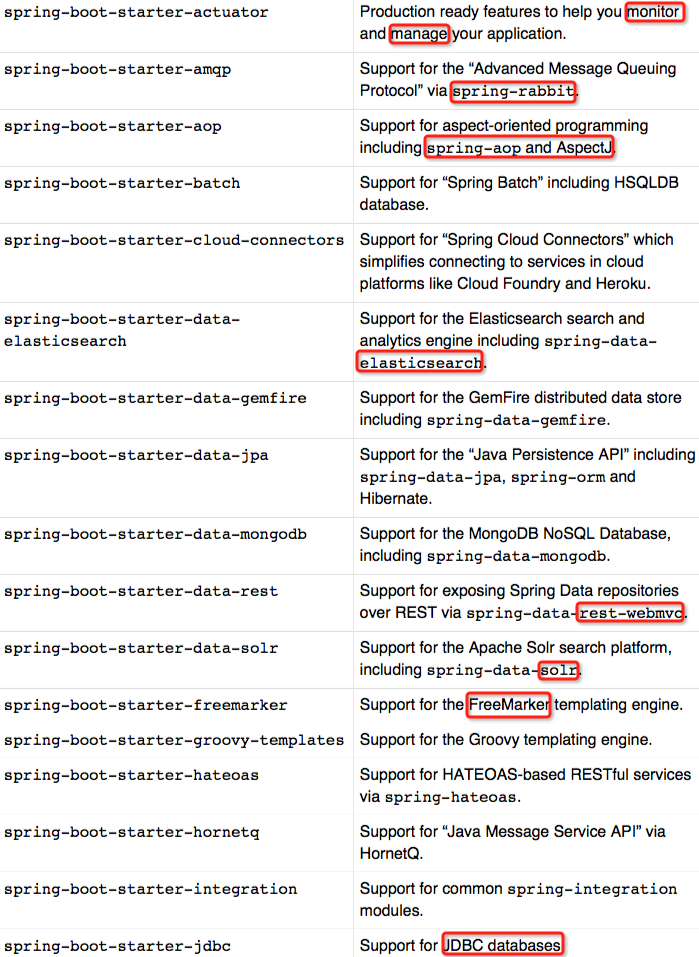
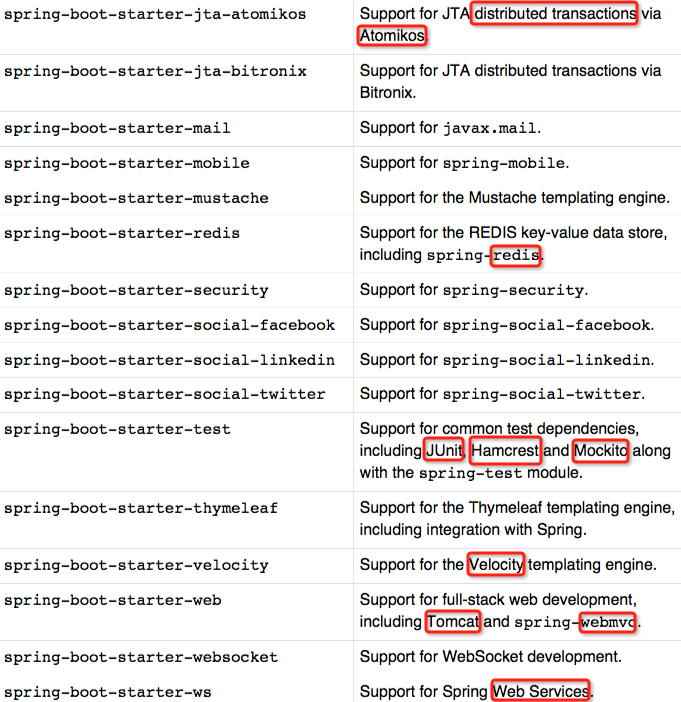
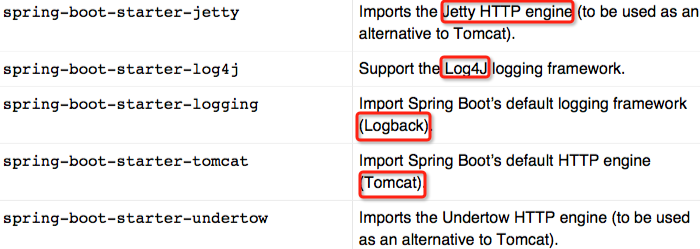
對於spring-boot而言,其本身有很多集成的jar包(見下邊),我們可以根據自己的需求引入相應的jar,但是暫無與mybatis集成的jar。
spring-boot相關的依賴包(可以根據需求自己引入):