首先推薦幾篇有關驗證碼識別的文章,覺得不錯
php實現驗證碼的識別(初級篇)
關於bp神經網格識別驗證碼
一、思路
碰見一個驗證碼,如果我們想要識別它,我們需要的是做什麼呢?
我們先觀察幾個驗證碼............


我們用人眼去觀察,會很顯然的認出驗證碼所包含的字符,那麼人眼的“識別機理”是什麼呢?
大概是驗證碼圖片字符的背景的顏色區別吧,試想,如果字符和背景沒有顏色區別,我們能夠判斷驗證碼嗎,很顯然不能。
所以,我們就可以從人出發。
先從圖片的顏色著手,即圖片的RGB信息。
RGB色彩模式是工業界的一種顏色標准,是通過對紅(R)、綠(G)、藍(B)三個顏色通道的變化以及它們相互之間的疊加來得到各式各樣的顏色的,RGB即是代表紅、綠、藍三個通道的顏色,這個標准幾乎包括了人類視力所能感知的所有顏色,是目前運用最廣的顏色系統之一。
定義函數取得RGB信息
 1 //代碼本來是一個類,現在拆開來寫的,有可能有不嚴謹的地方,大家可以看得懂就好了
 2
 3 /*
 4  *取得圖片路徑和圖片尺寸
 5  */
 6 $this->ImagePath = $Image;
 7 $this->ImageSize = getimagesize($Image);
 8
 9 /*
10  *獲取圖像標識符,保存到ImageInfo,只能處理bmp,png,jpg圖片
11  *ImageCreateFromBmp是我自己定義的函數,最後會給出
12  */
13 function getInfo(){
14     $filetype = substr($this->ImagePath,-3);
15     if($filetype == 'bmp'){
16         $this->ImageInfo = $this->ImageCreateFromBmp($this->ImagePath);
17     }elseif($filetype == 'jpg'){
18         $this->ImageInfo = imagecreatefromjpeg($this->ImagePath);
19     }elseif($filetype == 'png'){
20         $this->ImageInfo = imagecreatefrompng($this->ImagePath);
21     }
22 }
23
24 /*獲取圖片RGB信息*/
25 function getRgb(){
26     $rgbArray = array();
27     $res = $this->ImageInfo;
28     $size = $this->ImageSize;
29     $wid = $size['0'];
30     $hid = $size['1'];
31     for($i=0; $i < $hid; ++$i){
32         for($j=0; $j < $wid; ++$j){
33             $rgb = imagecolorat($res,$j,$i);
34             $rgbArray[$i][$j] = imagecolorsforindex($res, $rgb);
35         }
36     }
37     return $rgbArray;
38 }
二、二值化
因為人眼可以分別出驗證碼,所以驗證碼的RGB信息就會有一定的特點,這時候需要我們觀察一下,直接打印RGB數組是不好觀察的…………,好多數啊
在php實現驗證碼的識別(初級篇)中,作者的判斷依據是
無論驗證數字顏色如何變化,該數字的 RGB 值總有一個值小於 125
我們先獲取他的灰度,再判斷
 1 /*
 2  *獲取灰度信息
 3  */
 4 function getGray(){
 5     $grayArray = array();
 6     $size = $this->ImageSize;
 7     $rgbarray = $this->getRgb();
 8     $wid = $size['0'];
 9     $hid = $size['1'];
10     for($i=0; $i < $hid; ++$i){
11         for($j=0; $j < $wid; ++$j){
12             $grayArray[$i][$j] = (299*$rgbarray[$i][$j]['red']+587*$rgbarray[$i][$j]['green']+144*$rgbarray[$i][$j]['blue'])/1000;
13         }
14     }
15     return $grayArray;
16 }
然後我們根據灰度信息,打印圖片,注意不是打印灰度信息
 1 /*根據灰度信息打印圖片*/
 2 function printByGray(){
 3     $size = $this->ImageSize;
 4     $grayArray = $this->getGray();
 5     $wid = $size['0'];
 6     $hid = $size['1'];
 7     for($k=0;$k<25;$k++){
 8         echo $k."\n";
 9         for($i=0; $i < $hid; ++$i){
10             for($j=0; $j < $wid; ++$j){
11                 if($grayArray[$i][$j] < $k*10){
12                     echo '■';
13                 }else{
14                     echo '□';
15                 }
16             }
17             echo "|\n";
18         }
19         echo "---------------------------------------------------------------------------------------------------------------\n";
20     }
21
22 }
注意到,從$grayArray[$i][$j] < 80就會有顯然的輸出,我們觀察選擇了一個恰當的阈值,得到一個0101的數組,我們已經將我們的圖片轉化為了字符(1)和背景(0),即二值化。
 1 /*
 2  *根據自定義的規則,獲取二值化二維數組
 3  *@return  圖片高*寬的二值數組(0,1)
 4  */
 5 function getErzhi(){
 6     $erzhiArray = array();
 7     $size = $this->ImageSize;
 8     $grayArray = $this->getGray();
 9     $wid = $size['0'];
10     $hid = $size['1'];
11     for($i=0; $i < $hid; ++$i){
12         for($j=0; $j <$wid; ++$j){
13             if( $grayArray[$i][$j]    < 90 ){
14                 $erzhiArray[$i][$j]=1;
15             }else{
16                 $erzhiArray[$i][$j]=0;
17             }
18         }
19     }
20     return $erzhiArray;
21 }
三、去除噪點
但是我們發現有一些小點影響了我們的判斷
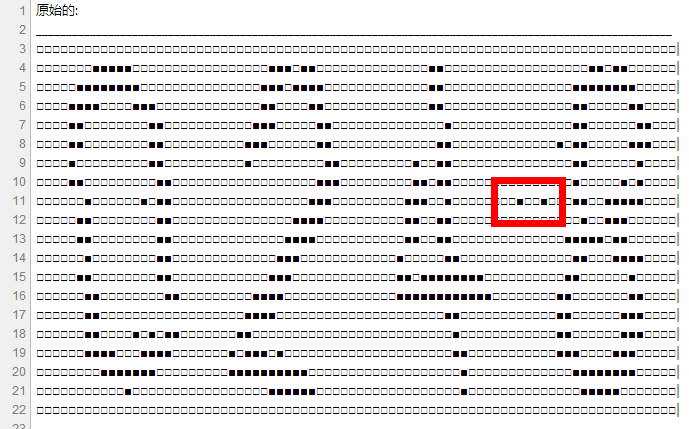
我們可以注意到這些事干擾噪點,但是如果我們是機器的話,我們如何判斷這些點是否是字符呢?
所以接下來,我們需要將這些字符去除。
我們判斷,如果一個黑點的上下左右的八個點全部是白,我們就認為它是噪點,並予以清除,賦為白
 1 /*
 2  *二值化圖片降噪
 3  *@param $erzhiArray二值化數組
 4  */
 5 function reduceZao($erzhiArray){
 6     $data = $erzhiArray;
 7     $gao = count($erzhiArray);
 8     $chang = count($erzhiArray['0']);
 9
10     $jiangzaoErzhiArray = array();
11
12     for($i=0;$i<$gao;$i++){
13         for($j=0;$j<$chang;$j++){
14             $num = 0;
15             if($data[$i][$j] == 1)
16             {
17                 // 上
18                 if(isset($data[$i-1][$j])){
19                     $num = $num + $data[$i-1][$j];
20                 }
21                 // 下
22                 if(isset($data[$i+1][$j])){
23                     $num = $num + $data[$i+1][$j];
24                 }
25                 // 左
26                 if(isset($data[$i][$j-1])){
27                     $num = $num + $data[$i][$j-1];
28                 }
29                 // 右
30                 if(isset($data[$i][$j+1])){
31                     $num = $num + $data[$i][$j+1];
32                 }
33                 // 上左
34                 if(isset($data[$i-1][$j-1])){
35                     $num = $num + $data[$i-1][$j-1];
36                 }
37                 // 上右
38                 if(isset($data[$i-1][$j+1])){
39                     $num = $num + $data[$i-1][$j+1];
40                 }
41                 // 下左
42                 if(isset($data[$i+1][$j-1])){
43                     $num = $num + $data[$i+1][$j-1];
44                 }
45                 // 下右
46                 if(isset($data[$i+1][$j+1])){
47                     $num = $num + $data[$i+1][$j+1];
48                 }
49             }
50
51                 if($num < 1){
52                     $jiangzaoErzhiArray[$i][$j] = 0;
53                 }else{
54                     $jiangzaoErzhiArray[$i][$j] = 1;
55                 }
56         }
57     }
58     return $jiangzaoErzhiArray;
59
60 }
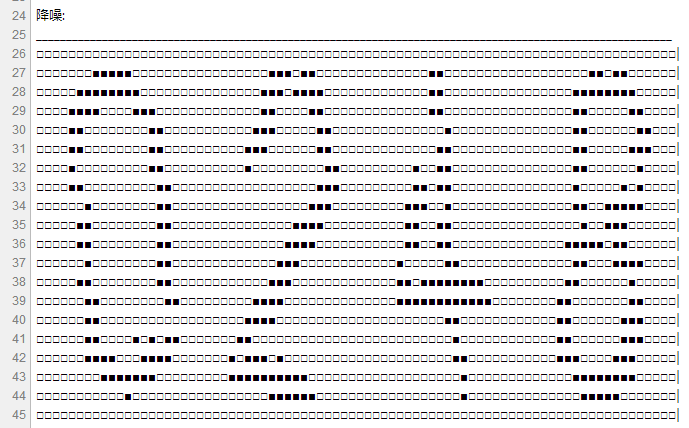
我們發現噪點消失了。
四、分割
這個時候,我們就需要對單一數字字母進行操作了,我們先將數字提取出來。
有些驗證碼字符相連,特別難!!!
我們分別從左到右,從右到左,從上到下,從下到上,進行掃描,去除白點,找到邊框。
 1 /*
 2  *歸一化處理,針對一個個的數字,即去除字符周圍的白點
 3  *@param $singleArray 二值化數組
 4  */
 5 function getJinsuo($singleArray){
 6     $dianCount = 0;
 7     $rearr = array();
 8
 9     $gao = count($singleArray);
10     $kuan = count($singleArray['0']);
11
12     $dianCount = 0;
13     $shangKuang = 0;
14     $xiaKuang = 0;
15     $zuoKuang = 0;
16     $youKuang = 0;
17     //從上到下掃描
18     for($i=0; $i < $gao; ++$i){
19         for($j=0; $j < $kuan; ++$j){
20             if( $singleArray[$i][$j] == 1){
21                 $dianCount++;
22             }
23         }
24         if($dianCount>1){
25             $shangKuang = $i;
26             $dianCount = 0;
27             break;
28         }
29     }
30     //從下到上掃描
31     for($i=$gao-1; $i > -1; $i--){
32         for($j=0; $j < $kuan; ++$j){
33             if( $singleArray[$i][$j] == 1){
34                 $dianCount++;
35             }
36         }
37         if($dianCount>1){
38             $xiaKuang = $i;
39             $dianCount = 0;
40             break;
41         }
42     }
43     //從左到右掃描
44     for($i=0; $i < $kuan; ++$i){
45         for($j=0; $j < $gao; ++$j){
46             if( $singleArray[$j][$i] == 1){
47                 $dianCount++;
48             }
49         }
50         if($dianCount>1){
51             $zuoKuang = $i;
52             $dianCount = 0;
53             break;
54         }
55     }
56     //從右到左掃描
57     for($i=$kuan-1; $i > -1; --$i){
58         for($j=0; $j < $gao; ++$j){
59             if( $singleArray[$j][$i] == 1){
60                 $dianCount++;
61             }
62         }
63         if($dianCount>1){
64             $youKuang = $i;
65             $dianCount = 0;
66             break;
67         }
68     }
69     for($i=0;$i<$xiaKuang-$shangKuang+1;$i++){
70         for($j=0;$j<$youKuang-$zuoKuang+1;$j++){
71             $rearr[$i][$j] = $singleArray[$shangKuang+$i][$zuoKuang+$j];
72         }
73     }
74     return $rearr;
75 }
然後從左到右掃描,找到字符的分割
返回三維數組,每一維就是一個字符。
 1 /*
 2  *切割成三維數組,每個小數字在一個數組裡面
 3  *只適用四個數字一起的數組
 4  *@param 經過歸一化處理的二值化數組
 5  */
 6 function cutSmall($erzhiArray){
 7     $doubleArray = array();
 8     $jieZouyou = array();
 9
10     $gao = count($erzhiArray);
11     $kuan = count($erzhiArray['0']);
12
13     $jie = 0;
14     $s = 0;
15     $jieZouyou[$s] = 0;
16     $s++;
17     //從左到右掃描
18
19     for($i=0; $i < $kuan;){
20         for($j=0; $j < $gao; ++$j){
21             $jie = $jie + $erzhiArray[$j][$i];
22         }
23         //如果有一列全部是白,設置$jieZouyou,並且跳過中間空白部分
24         if($jie == 0){
25             $jieZouyou[$s] = $i+1;
26             do{
27                 $n = ++$i;
28                 $qian = 0;
29                 $hou = 0;
30                 for($m=0; $m < $gao; ++$m){
31                     $qian = $qian + $erzhiArray[$m][$n];
32                     $hou = $hou + $erzhiArray[$m][$n+1];
33                 }
34                 $jieZouyou[$s+1] = $n+1;
35             }
36             //當有兩列同時全部為白,說明有間隙,循環,知道間隙沒有了
37             while($qian == 0 && $hou == 0);
38             $s+=2;
39             $i++;
40         }else{
41             $i++;
42         }
43
44         $jie = 0;
45     }
46     $jieZouyou[] = $kuan;
47     //極端節點數量,(應該是字符個數)*2
48     $jieZouyouCount = count($jieZouyou);
49
50     for($k=0;$k<$jieZouyouCount/2;$k++){
51         for($i=0; $i < $gao; $i++){
52             for($j=0; $j < $jieZouyou[$k*2+1]-$jieZouyou[$k*2]-1; ++$j){
53                 $doubleArray[$k][$i][$j] = $erzhiArray[$i][$j+$jieZouyou[$k*2]];
54             }
55         }
56
57     }
58     return $doubleArray;
59 }
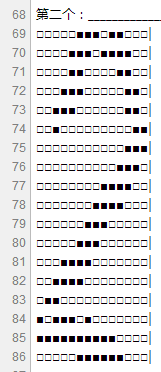
五、傾斜調整
我們發現第三個9有一點傾斜,
我們需要將傾斜的圖片“正”過來
人怎麼處理的呢,先眼睛觀察“傾斜了多少度”,然後把圖片扭過來多少度,並且觀察->負反饋->大腦傳遞扭轉角度時刻在發生,最後圖片就“正”過來了。
人是怎麼觀察“傾斜”的,以上面的“2”做例子,可能是右上方(左下方)的黑色比左上方(右下方)的多?
我們建立X軸正向向下,Y軸向右的直角坐標系
我們計算每一層的黑點的分布中點坐標,得到一系列離散點,計算這些點所在的直線(線性回歸方程的計算,),公式y = b*x+a,

竟然有用到這個公式的一天!!!
大概就是一條傾斜的直線了,通過直線計算直線傾斜角度,然後轉這麼多的角度,圖片應該就“正”了吧。
其中a,b的計算如下
 1 /*
 2  *定義求線性回歸A和B的函數
 3  *@param $zuobiaoArray坐標的三維數組
 4  */
 5 function getHuigui($zuobiaoArray){
 6     $y8 = 0;
 7     $x8 = 0;
 8     $x2 = 0;
 9     $xy = 0;
10     $geshu = count($zuobiaoArray);
11     for($i=0;$i<$geshu;$i++){
12         $y8 = $y8+$zuobiaoArray[$i]['y'];
13         $x8 = $x8+$zuobiaoArray[$i]['x'];
14         $xy = $xy+$zuobiaoArray[$i]['y']*$zuobiaoArray[$i]['x'];
15         $x2 = $x2 + $zuobiaoArray[$i]['x']*$zuobiaoArray[$i]['x'];;
16     }
17     $y8 = $y8/$geshu;
18     $x8 = $x8/$geshu;
19
20     $b = ($xy-$geshu*$y8*$x8)/($x2-$geshu*$x8*$x8);
21     $a = $y8-$b*$x8;
22     $re['a'] = $a;
23     $re['b'] = $b;
24     return $re;
25     //y = b * x + a
26 }
怎麼轉角?
1、可以直接對圖片進行操作,但是發現有比較大的失真,就沒有繼續了。
2、或者,對黑點白點的坐標進行操作……
這就是三角函數了,好長時間不碰三角函數,都差點忘記了。
定義函數
 1 /*
 2  *定義轉化坐標的函數
 3  *@param $x x坐標即$i
 4  *@param $y y坐標,即j
 5  *@param $b 線性回歸方程的b參數
 6  */
 7 function getNewZuobiao($x,$y,$b){
 8     if($x == 0){
 9         if($y>0){
10             $xianJiao = M_PI/2;
11         }elseif($y<0){
12             $xianJiao = -M_PI/2;
13         }else{
14             $p['x'] = 0;
15             $p['y'] = 0;
16             return $p;
17         }
18     }else{
19         $xianJiao = atan($y/$x);
20     }
21     $jiao =$xianJiao-atan($b);
22     $chang = sqrt($x*$x+$y*$y);
23     $p['x'] = $chang*cos($jiao);
24     $p['y'] = $chang*sin($jiao);
25     return $p;
26 }
轉角吧
 1 /*
 2  *對【單個】數字的二值化二維數組進行傾斜調整
 3  *@param  $singleArray  高*寬的二值數組(0,1)
 4  */
 5 function singleSlopeAdjust($singleErzhiArray){
 6     $slopeArray = array();
 7     $gao = count($singleErzhiArray);
 8     $chang = count($singleErzhiArray['0']);
 9
10     //初始化$slopeArray
11     for($i=0;$i<$gao*4;$i++){
12         for($j=0;$j<$chang*4;$j++){
13             $slopeArray[$i][$j] = 0;
14         }
15     }
16
17     //初始化中心坐標(是數組的下標)
18     $centerXfoalt = ($gao-1)/2;
19     $centerYfoalt = ($chang-1)/2;
20     $centerX = ceil($centerXfoalt);
21     $centerY = ceil($centerYfoalt);
22
23     //初始化圖片傾斜诶角度
24     /*斜率的計算!!!!!,回歸方程*/
25     //從上到下掃描,計算中點,求得一串坐標($i,$ava)
26     for($i=0;$i<$gao;$i++){
27         $Num = 0;
28         $Amount = 0;
29         for($j=0;$j<$chang;$j++){
30             if($singleErzhiArray[$i][$j] == 1){
31                 $Num = $Num+$j;
32                 $Amount++;
33             }
34         }
35         if($Amount == 0){
36             $Ava[$i] = $chang/2;
37         }else{
38             $Ava[$i] = $Num/$Amount;
39         }
40     }
41
42
43     //計算線性回歸方程的b與a
44     $zuo = array();
45     for($j=0;$j<count($Ava);$j++){
46         $zuo[$j]['x'] = $j;
47         $zuo[$j]['y'] = $Ava[$j];
48     }
49     $res = $this->getHuigui($zuo);
50     $zuoB = $res['b'];
51
52
53     for($i=0;$i<$gao;$i++){
54         for($j=0;$j<$chang;$j++){
55             if($singleErzhiArray[$i][$j] == 1){
56                 $splodeZuobiao = $this->getNewZuobiao($i,$j,$zuoB);
57                 $splodeX = $splodeZuobiao['x'];
58                 $splodeY = $splodeZuobiao['y'];
59                 $slopeArray[$splodeX+$gao][$splodeY+$chang] = 1;
60             }
61         }
62     }
63
64     //將預處理的數組空白清理
65     $slopeArray = $this->getJinsuo($slopeArray);
66     return $slopeArray;
67 }
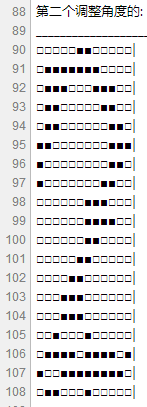
看到正了一些
六、統一大小
上文中因為各種操作,每個字符大小不一,我們需要統一大小
七、特征值的建立
有很多方法
1、逐像素特征提取法
這是一種最簡單的特征提取方法。它可以對圖像進行逐行逐列的掃描,當遇到黑色像素時取其特征值為1,遇到白色像素時取其特征值為0,這樣當掃描結束後就獲得一個維數與圖像中的像素點的個數相同的特征向量矩陣。
這種方法提取的信息量最大,但是它的缺點也很明顯,就是適應性不強。
2、骨架特征提取法
兩幅圖像由於它們的線條的粗細不同,使得兩幅圖像差別很大,但是將它們的線條進行細化後,統一到相同的寬度,如一個像素寬時,這是兩幅圖像的差距就不那麼明顯。利用圖形的骨架作為特征來進行數碼識別,就使得識別有了一定的適應性。一般使用細化的方法來提取骨架,細化的算法有很多,如Hilditch算法、Rosenfeld算法等。對經過細化的圖像利用EveryPixel函數進行處理就可以得到細化後圖像的特征向量矩陣。骨架特征提取的方法對於線條粗細不同的數碼有一定的適應性,但是圖像一旦出現偏移就難以識別。
3、微結構法
微結構法將圖像分為幾個小塊,統計每個小塊的像素分布。本文提取出漢字的39個特征,存儲在數組f[0]~f[38]中。具體算法可分為四步:
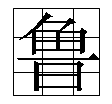


步驟一:把字符平均分成9份,如圖4.1所示,給每一份編號如圖4.2,統計每一份內黑色像素的個數,存儲在數字tz[0]~tz[9]中,統計在行方向和列方向上每一份內的黑色像素個數和與之相鄰的一份內黑色像素個數的比值作為一個特征,例如:行方向上提取特征f[0]=tz[1]/ tz[0],f[1]=tz[2]/ tz[1],f[2]=tz[0]/ tz[2],…,f[8]=tz[6]/ tz[8];列方向上f[9]=tz[3]/ tz[0],f[10]=tz[6]/ tz[3],f[11]=tz[0]/ tz[6],…,f[17]=tz[2]/ tz[8],共18個特征。
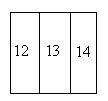
步驟二:把字符橫向分成三份,如圖4.3所示,統計每一份內的黑色像素個數,每一份內的黑色像素個數與前一份內黑色像素個數的比值作為一個特征,f[18]=tz[10]/ tz[9],f[19]=tz[11]/ tz[10],f[20]=tz[9]/ tz[11];把字符縱向分成三份,如圖4.4所示,統計每一份內的黑色像素個數,每一份內的黑色像素個數與前一份內黑色像素個數的比值作為一個特征,f[21]=tz[13]/ tz[12],f[22]=tz[14]/ tz[13],f[23]=tz[12]/ tz[14];共六個特征。
步驟三:如圖4.5,在豎直方向上找出三列,統計在該列中跳變點的個數,即相鄰點像素值從0變到255的次數,共三個特征,記為f[24],f[25],f[26];在水平方向上找出三行列,統計在該行中跳變點的個數,即相鄰點象素值從0變到255的次數,共三個特征,記為f[27],f[28],f[29]。
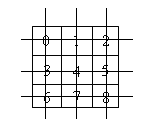
圖4.5
步驟四:把每一份內黑色象素的個數tz[0]~tz[9],作為9個特征,記為:f[30]~f[38]。
這樣得到漢字的共39個特征,根據這些特征就可以區分每個車牌漢字,進行識別。
我們使用最簡單的逐像素特征提取法。
多多增加數據庫,識別率會增加的
八、識別驗證碼
對於一個新的驗證碼,進行上文操作,然後對比數據庫就可以了
 1 /*
 2  *進行匹配
 3  *@param  $Image  圖片路徑
 4  */
 5 public function run($Image){
 6     $data = array('','','','');
 7     $result="";
 8     $bilu = '';
 9     $maxarr = '';
10
11     //提取特征
12     $this->prepare($Image);
13     $yuanshi = $this->getErzhi();
14     $yijijiangzao = $this->reduceZao($yuanshi);
15     $small = $this->cutSmall($yijijiangzao);
16     for($k=0;$k<4;$k++){
17         $tianchong = $this->tianChong($small[$k]);
18         $tiaozhenjiaodu = $this->singleSlopeAdjust($tianchong);
19         $tongyidaxiao = $this->tongyiDaxiao($tiaozhenjiaodu);
20         for($i=0;$i<20;$i++){
21             for($j=0;$j<20;$j++){
22                 $data[$k] .= $tongyidaxiao[$i][$j];
23             }
24         }
25     }
26
27     // 進行關鍵字匹配
28     foreach($data as $numKey => $numString)
29     {
30
31         $max = 0;
32         $num = 0;
33         foreach($this->Keys as $value => $key)
34         {
35             similar_text($value, $numString,$percent);
36             if($percent > $max)
37             {
38                 $max = $percent;
39                 $num = $key;
40                 $zim = $value;
41             }
42             if($max>95){
43                 break;
44             }
45         }
46         $result .=$num;
47         $maxarr[] = $max;
48     }
49     // 查找最佳匹配數字
50     $re = $maxarr;
51     $re[] = $result;
52     return $re;
53     //return $result.'|max|一:'.$maxarr['0'].'|二:'.$maxarr['1'].'|三:'.$maxarr['2'].'|四:'.$maxarr['3'];
54 }
試試:

<?php
Header("Content-type: image/gif");
/*
* 初始化
*/
$border = 0; //是否要邊框 1要:0不要
$how = 4; //驗證碼位數
$w = $how*15; //圖片寬度
$h = 20; //圖片高度
$fontsize = 5; //字體大小
$alpha = "abcdefghijkmnopqrstuvwxyz"; //驗證碼內容1:字母
$number = "023456789"; //驗證碼內容2:數字
$randcode = ""; //驗證碼字符串初始化
srand((double)microtime()*1000000); //初始化隨機數種子
$im = ImageCreate($w, $h); //創建驗證圖片
/*
* 繪制基本框架
*/
$bgcolor = ImageColorAllocate($im, 255, 255, 255); //設置背景顏色
ImageFill($im, 0, 0, $bgcolor); //填充背景色
if($border)
{
$black = ImageColorAllocate($im, 0, 0, 0); //設置邊框顏色
ImageRectangle($im, 0, 0, $w-1, $h-1, $black);//繪制邊框
}
/*
* 逐位產生隨機字符
*/
for($i=0; $i<$how; $i++)
{
$alpha_or_number = mt_rand(0, 1); //字母還是數字
$str = $alpha_or_number ? $alpha : $number;
$which = mt_rand(0, strlen($str)-1); //取哪個字符
$code = substr($str, $which, 1); //取字符
$j = !$i ? 4 : $j+15; //繪字符位置
$color3 = ImageColorAllocate($im, mt_rand(0,100), mt_rand(0,100), mt_rand(0,100)); //字符隨即顏色
ImageChar($im, $fontsize, $j, 3, $code, $color3); //繪字符
$randcode .= $code; //逐位加入驗證碼字符串
}
/*
* 添加干擾
*/
for($i=0; $i<5; $i++)//繪背景干擾線
{
$color1 = ImageColorAllocate($im, mt_rand(0,255), mt_rand(0,255), mt_rand(0,255)); //干擾線顏色
ImageArc($im, mt_ra......余下全文>>
原理不難,只需通過PHP來生成一張圖片!在這張圖片上通過PHP的圖片處理函數在圖片上寫幾個字符就Ok啦!在寫字符時注意將寫的字符記錄下,這個記錄是通過session來做!然後在驗證時直接調用$_SESSION變量就可以了!
具體的代碼如下:
有兩個文件
yangzhengma.php用來顯示圖片和驗證輸入的驗證碼
<?php
session_start();
if(!empty($_GET['sub'])){
if($_SESSION['checks'] == $_GET['ma']){
echo "驗證碼正確<BR/>";
}else{
echo "驗證碼不正確!<BR/>";
}
}
?>
<html>
<head>
<title>
驗證碼實例
</title>
<meta http-equiv="content-type" content="text/html;charset=utf-8"/>
</head>
<body>
<img src="check.php" border="0"/>
<br/>
<form method="get" action="">
請輸入驗證碼:<input type="text" id="ma" name="ma"/>
<input type="submit" id="sub" name="sub" value="驗證"/>
</form>
</body>
</html>
注意圖片的地址寫到PHP生成圖片的文件地址
check.php用來生成圖片
<?php
session_start();
header('content-type:image/jpeg');
$image_width=70;
$image_height=25;
$str="";
$arr=array(1,2,3,4,5,6,7,8,9,'A','B','C','D','E','F','G','H','I','J','K','L','M','N','P','Q','R','S','T','U','V','W','X','Y','Z');
for ($i =0 ; $i ......余下全文>>