FCKeditor官網:http://ckeditor.com/
FCKeditor下載:http://ckeditor.com/download
點擊去我的CSDN下載
在使用PHP開發留言板、CMS、博客時都涉及文本信息的處理,如何將信息優美地展現在讀者面前是PHP網站開發建設者所追求的,而在線編輯器實現了可視化的功能,最早PHP網站開發者都是使用UBB來實現文本信息的展現功能,之後出現了類似於WORD的在線編輯器,今天和大家介紹的是老牌在線編輯器Fckeditor在PHP環境中安裝配置與使用方法說明。
Fckeditor支持多種開發語言,如PHP、.NET、JAVA等,本文使用的是Fckeditor2.6.6版本,主要介紹Fckeditor2.6.6在PHP環境中如何安裝配置以及使用說明。
准備工作
首先我們需要下載Fckeditor安裝源碼包,請點擊下載Fckeditor,推薦下載Fckeditor2.6.6,根據系統環境你可以下載zip包或者tar.gz包。
Fckeditor安裝說明
Fckeditor安裝非常方便,只要解壓下載的Fckeditor2.6.6.zip包,將解壓的Fckeditor2.6.6文件夾下fckeditor文件夾復制到相應項目文件夾下即可。
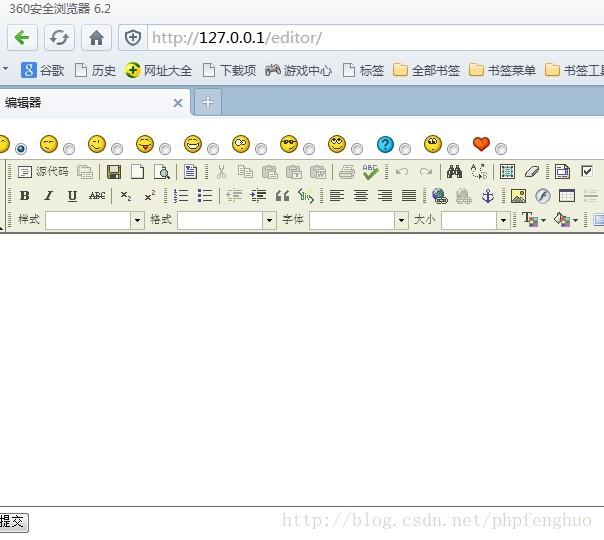
如下圖Default:

URL:http://www.bianceng.cn/webkf/PHP/201410/45944.htm
Fckeditor使用方法說明
Index.php
<?php
require_once 'editor/fckeditor.php';
?>
<!DOCTYPE html PUBLIC "-//W3C//DTD XHTML 1.0 Transitional//EN" "http://www.w3.org/TR/xhtml1/DTD/xhtml1-transitional.dtd">
<html xmlns="http://www.w3.org/1999/xhtml">
<head>
<meta http-equiv="Content-Type" content="text/html; charset=gbk"  />
<title>編輯器</title>
</head>
  <body>
      <form action="do.php" method="post" enctype="multipart/form-data">
      <div class="reviewFace">
        <img src="images/em01.gif"><input name="cFace" value="images/em01.gif" checked="checked" type="radio">
        <img src="http://127.0.0.1/editor/images/em02.gif"><input name="cFace" value="http://127.0.0.1/editor/images/em02.gif" type="radio">
        <img src="http://127.0.0.1/editor/images/em03.gif"><input name="cFace" value="http://127.0.0.1/editor/images/em03.gif" type="radio">
        <img src="http://127.0.0.1/editor/images/em04.gif"><input name="cFace" value="http://127.0.0.1/editor/images/em04.gif" type="radio">
        <img src="http://127.0.0.1/editor/images/em05.gif"><input name="cFace" value="http://127.0.0.1/editor/images/em05.gif" type="radio">
        <img src="http://127.0.0.1/editor/images/em06.gif"><input name="cFace" value="http://127.0.0.1/editor/images/em06.gif" type="radio">
        <img src="http://127.0.0.1/editor/images/em07.gif"><input name="cFace" value="http://127.0.0.1/editor/images/em07.gif" type="radio">
        <img src="http://127.0.0.1/editor/images/em08.gif"><input name="cFace" value="http://127.0.0.1/editor/images/em08.gif" type="radio">
        <img src="http://127.0.0.1/editor/images/em09.gif"><input name="cFace" value="http://127.0.0.1/editor/images/em09.gif" type="radio">
        <img src="http://127.0.0.1/editor/images/em10.gif"><input name="cFace" value="http://127.0.0.1/editor/images/em10.gif" type="radio">
        <img src="http://127.0.0.1/editor/images/em14.gif"><input name="cFace" value="http://127.0.0.1/editor/images/em14.gif" type="radio">
      </div>
      <div class="reviewFace">
            <?php
            $FCKeditor = new FCKeditor('cContent'); //name="cContent";
            $FCKeditor -> Width = '100%';
            $FCKeditor -> Height = '350';
            $FCKeditor -> BasePath = 'editor/';
            $FCKeditor -> ToolbarSet = 'Default';
            echo $FCKeditor->CreateHtml();
            ?>
     </div>
     <input type="submit" value="提交">
   </form>
  </body>
 </html>
說明:默認Fckeditor提供兩種模式的工具欄,即Default和Basic,Default提供了所有的Fckeditor工具欄功能,Basic則提供了最基礎的Fckeditor工具欄功能,簡而言之Default主要是為後台管理人員提供的,而Basic主要為前台用戶提供,只要在使用Fckeditor類時配置
<?php
$FCKeditor->ToolbarSet = 'Basic';
?>
如果你對Fckeditor提供的這兩種工具欄並不滿足,你可以根據需求定義自己的工具欄,可通過第二種方式,即修改fckeditor.js文件來實現,打開fckeditor.js,找到FCKConfig.ToolbarSets,你可以修改和添加Default和Basic模式中定義的工具欄功能,甚至你可以創建一個新的工具欄,比如Leapsoulcn工具欄,在fckeditor.js文件中添加
FCKConfig.ToolbarSets["Leapsoulcn"] = [

<span> </span>['Bold','Italic','-','OrderedList','UnorderedList','-','Link','Unlink']

] ;
然後在使用Fckeditor類時,定義