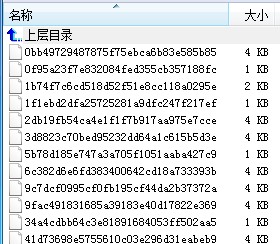
wordpress評論中的頭像是使用Gravatar的頭像服務(Gravatar官方注冊地址:http://en.gravatar.com),用戶的緩存頭像一般都是固定不變的,所以我們可以將頭像緩存到本地來提高我們網站的訪問速度。
我的wordpress avatar目錄的頭像緩存:

wordpress頭像緩存功能設置方法
首先是在根目錄下建立一個文件夾avatar,權限755。再在裡面放一個默認的頭像(default.jpg),沒頭像的童鞋就會用默認的。代碼如下:
function my_avatar( $email, $size = '32', $default = '', $alt = '') {
 $f = md5( strtolower( $email ) );
 $a = WP_CONTENT_URL . '/avatar/'. $f . $size . '.png';
 $e = WP_CONTENT_DIR . '/avatar/' . $f . $size . '.png';
 $d = WP_CONTENT_DIR . '/avatar/' . $f . '-d.png';

 if($default=='')
  $default = 'http://www.wpnoob.cn/avatar/default.jpg'; //尺寸需要改為你自己網站評論的默認頭像

 $t = 2592000; // 緩存有效期30天, 這裡單位:秒
 if ( !is_file($e) || (time() - filemtime($e)) > $t ) {
  if ( !is_file($d) || (time() - filemtime($d)) > $t ) {
   // 驗證是否有頭像
   $uri = 'http://www.gravatar.com/avatar/' . $f . '?d=404';
   $headers = @get_headers($uri);
   if (!preg_match("|200|", $headers[0])) {
    // 沒有頭像,則新建一個空白文件作為標記
    $handle = fopen($d, 'w');
    fclose($handle);

    $a = $default;
   }
   else {
    // 有頭像且不存在則更新
    $r = get_option('avatar_rating');
    $g = 'http://www.gravatar.com/avatar/'. $f. '?s='. $size. '&r=' . $r;
    copy($g, $e);
   }
  }
  else {
   $a = $default;
  }
 }

 $avatar = "<img alt='{$alt}' src='{$a}' class='avatar avatar-{$size} photo' height='{$size}' width='{$size}' />";
 return apply_filters('my_avatar', $avatar, $email, $size, $default, $alt);
}
再將以上代碼添加到你主題的functions.php文件。
將獲取頭像地址的 get_avatar 函數替換為 my_avatar 。有個例外,functions.php評論列表函數中:
get_avatar( $comment
需要改成:
my_avatar( $comment->comment_author_email
因為my_avatar函數只能通過Email來調取用戶頭像,所以以上情況,需要將第一個參數改成email地址。
get_avatar函數介紹:
用上面的方法簡單方便啊。 不過還有一步是要注意的。得要確認在調用頭像的地方都是用get_avatar函數來完成的。一般都是了,只有以前老的theme才不是。不是的話改過來就行。
如改為:
<?php
 echo get_avatar( $comment->comment_author_email, $size = '48', $default = get_bloginfo('wpurl') . '/avatar/default.jpg' );
?>
代理(squid)中更新css/js文件緩存的方法
在wordpress添加css或者js文件,我們一般使用這四個函數來實現:
函數中你可以定義css/js的版本號,以便我們在對css/js文件更新時能夠清楚浏覽器的緩存,默認的版本號是wordpress的版本號。版本號會鏈接在css/js完整路徑的後面,一般在版本號變更後,css/js載入的樣式的完整URL也會變更,浏覽器發現URL變更會重新請求css/js文件,這樣就能達到載入最新的css/js文件。
但是很多代理軟件(比如squid)並不支持”?“號形式的cache,我們在使用反向代理來cache我們的網站時,特別在squid3.0以後,已經開始不對帶”?”號的url進行緩存了。所以我們如果要使用squid的緩存功能就必須去掉”?”,更新squid代理商的緩存只能通過修改文件名來實現。
以下我們將介紹在wordpress通過對版本號的控制來修改js/css文件名從而能夠在代理軟件中達到緩存的目的:
1、在我們的主題代碼functions.php文件中添加如下代碼:
/**
 * Description: wordpress在代理(squid)中更新css/js文件緩存的方法
 * Author:wordpress教程網
 * Author URI: http://www.wpnoob.cn/
 */
function ds_filename_based_cache_busting( $src ) {
 // 管理員的後台css/js文件無需處理
 if ( is_admin() )
 return $src;
 //將版本號添加到文件名中已”.“號來區分
 return preg_replace(
 '/\.(js|css)\?ver=(.+)$/',
 '.$2.$1',
 $src
 );
}
add_filter( 'script_loader_src', 'ds_filename_based_cache_busting' );
add_filter( 'style_loader_src', 'ds_filename_based_cache_busting' );
如果你使用的是apache服務器,在你的根目錄的.htaccess文件下添加:
<IfModule mod_rewrite.c>
   RewriteEngine On
   RewriteBase /

   RewriteCond %{REQUEST_FILENAME} !-f
   RewriteCond %{REQUEST_FILENAME} !-d
   RewriteRule ^(.+)\.(.+)\.(js|css)$ $1.$3 [L]
</IfModule>
如果你是nginx服務器配置如下:
location ~ ^(.+)\.(.+)\.(js|css)$ {
  alias $1.$3;
}