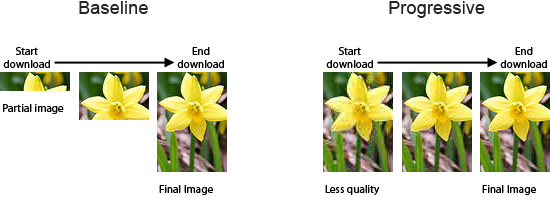
今天才認識到原來JPEG文件有兩種保存方式他們分別是Baseline JPEG(標准型)和Progressive JPEG(漸進式)。兩種格式有相同尺寸以及圖像數據,他們的擴展名也是相同的,唯一的區別是二者顯示的方式不同。
Baseline JPEG
這種類型的JPEG文件存儲方式是按從上到下的掃描方式,把每一行順序的保存在JPEG文件中。打開這個文件顯示它的內容時,數據將按照存儲時的順序從上到下一行一行的被顯示出來,直到所有的數據都被讀完,就完成了整張圖片的顯示。如果文件較大或者網絡下載速度較慢,那麼就會看到圖片被一行行加載的效果,這種格式的JPEG沒有什麼優點,因此,一般都推薦使用Progressive JPEG。

Progressive JPEG
和Baseline一遍掃描不同,Progressive JPEG文件包含多次掃描,這些掃描順尋的存儲在JPEG文件中。打開文件過程中,會先顯示整個圖片的模糊輪廓,隨著掃描次數的增加,圖片變得越來越清晰。這種格式的主要優點是在網絡較慢的情況下,可以看到圖片的輪廓知道正在加載的圖片大概是什麼。在一些網站打開較大圖片時,你就會注意到這種技術。

漸進式圖片帶來的好處是可以讓用戶在沒有下載完圖片就可以看到最終圖像的大致輪廓,一定程度上可以提升用戶體驗。(瀑布留的網站建議還是使用標准型的)

另外漸進式的圖片的大小並不會和基本的圖片大小相差很多,有時候可能會比基本圖片更小。漸進式的圖片的缺點就是吃用戶的CPU和內存,不過對於現在的電腦來說這點圖片的計算並不算什麼。
說了這邊多下面就改講講怎麼講圖片保存為或者轉化為Progressive JPEG了。
1、PhotoShop
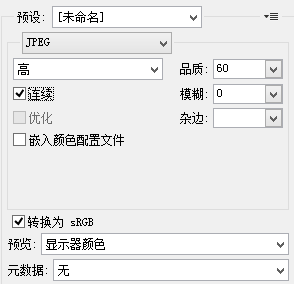
在photoshop中有“存儲為web所用格式”,打開後選擇“連續”就是漸進式JPEG。

具體教程參考 http://www.jb51.net/photoshop/182198.html
2、Linux
檢測是否為progressive jpeg : identify -verbose filename.jpg | grep Interlace(如果輸出 None 說明不是progressive jpeg;如果輸出 Plane 說明是 progressive jpeg。)
將basic jpeg轉換成progressive jpeg:> convert infile.jpg -interlace Plane outfile.jpg
3、PHP
使用 imageinterlace 和 imagejpeg 函數我們可以輕松解決轉換問題。
<?php
    $im = imagecreatefromjpeg('pic.jpg');
    imageinterlace($im, 1);
    imagejpeg($im, './php_interlaced.jpg', 100);
    imagedestroy($im);
?>
4、Python
import PIL
from exceptions import IOError
img = PIL.Image.open("c:\\users\\biaodianfu\\pictures\\in.jpg")
destination = "c:\\users\\biaodianfu\\pictures\\test.jpeg"
try:
  img.save(destination, "JPEG", quality=80, optimize=True, progressive=True)
except IOError:
  PIL.ImageFile.MAXBLOCK = img.size[0] * img.size[1]
  img.save(destination, "JPEG", quality=80, optimize=True, progressive=True)
5、jpegtran
jpegtran -copy none -progressive <inputfile> <outputfile>
6、C#
using (Image source = Image.FromFile(@"D:\temp\test2.jpg")) {
  ImageCodecInfo codec = ImageCodecInfo.GetImageEncoders().First(c => c.MimeType == "image/jpeg");
  EncoderParameters parameters = new EncoderParameters(3);
  parameters.Param[0] = new EncoderParameter(System.Drawing.Imaging.Encoder.Quality, 100L);
  parameters.Param[1] = new EncoderParameter(System.Drawing.Imaging.Encoder.ScanMethod, (int)EncoderValue.ScanMethodInterlaced);
  parameters.Param[2] = new EncoderParameter(System.Drawing.Imaging.Encoder.RenderMethod, (int)EncoderValue.RenderProgressive);
  source.Save(@"D:\temp\saved.jpg", codec, parameters);
}
以上就是使用漸進式JPEG圖片來提升頁面體驗度的全部內容了,很簡單實用,這裡推薦給小伙伴們。